
If you have never learned compass reading before it can be a little daunting to start. With all the numbers, scales, and degrees on there, you might be tempted to just skip it and rely on digital varieties like the one installed on your phone.
But when the chips are down and your battery’s drained, the humble, old-fashioned compass becomes your number one wilderness survival tool. More than just telling which way north is, the compass can help you locate yourself in the middle of any terrain, follow a specific direction amidst unmarked trails, tell you how far you have to go and, finally, find your way safely to camp.
Interested? Great! Here’s a quick guide on how you can teach yourself the basics of reading a compass.
Table of Contents
Identifying Parts of a Compass
Compasses, no matter what kind, come with key parts that allow you to orient yourself and travel in the correct direction. Below, we’ve listed the main components of a typical compass.
(Note that not all compasses will have all of these parts. Some may also have variants of the features we have listed.)
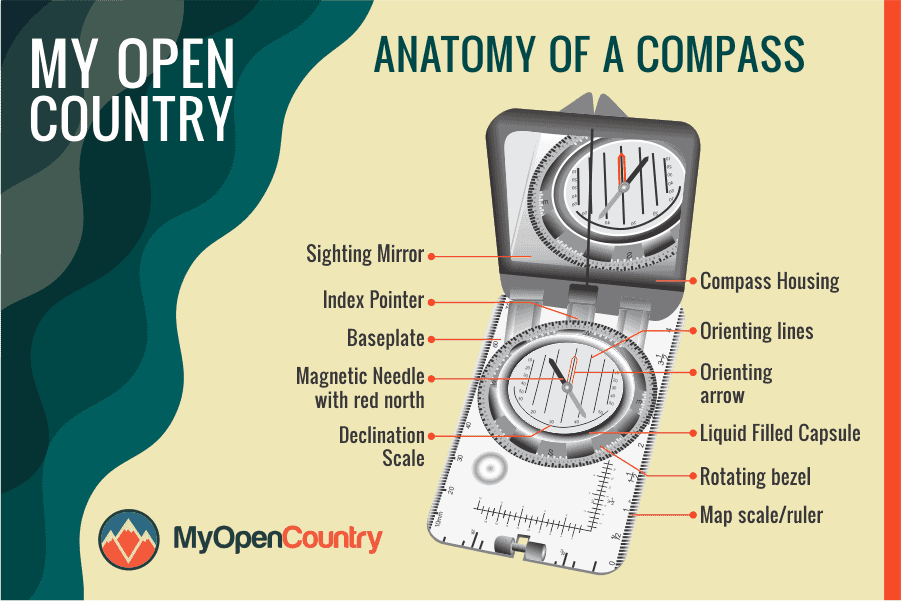
Baseplate
This is the plastic plate the compass is attached to. It’s a hard and flat surface with at least one straight edge that’s used for taking bearings. The plate is conveniently made from clear acrylic to allow you to see the map underneath it.
Scales or Rulers
The baseplate is marked with scales on each edge. These “rulers” are used to accurately measure distances on a map.
Travel Arrow
On most compasses, the rulers are accompanied by a direction of travel or travel arrow which simply points towards the direction in which you should travel after taking bearings and setting your compass.
Magnifying Glass
This component enables you to see the small print or fine details of a map. Handily, the magnifying glass can also double as a first aid tool that helps find splinters.
Rotating Bezel
Bezel ring, rotating bezel, dial, azimuth ring – this particular component of the compass goes by many names, but all share the same purpose—to rotate and allow you to set bearings. The bezel is marked up to 360 degrees and includes the four cardinal directions to further help with navigation.
Index Line
This thick, usually red line is normally located just above the bezel. It tells you where to read your bearings.
Housing
The housing contains the magnetized needle, the orienting arrow, orienting lines, and declination scale. It’s filled with clear liquid that protects the needle and allows it to settle in place after movement
Magnetized Needle
Inside the bezel is an arrow-like needle that’s divided into two colors: red for north and black (or white) for south. The needle sits on a fine point at the center that allows it to rotate freely and constantly return to point to magnetic north (i.e. not True North but north in the Earth’s magnetic field).
Orienting Arrow
The orienting arrow is a large arrow that identifies north within the rotating bezel. It moves with the bezel when rotated and is sized in a way that perfectly outlines the magnetized needle. The arrow can be adjusted when you’re calibrating for magnetic declination.
Orienting Lines
These are a series of lines located either side of the orienting arrow. They’re used to orient your compass to the grid on the map. These lines move with the bezel.
Declination Scale
In any location, magnetic north and True North differ by several degrees. This difference is called declination. Some compasses use declination marks on the housing to help you adjust for declination quicker and more accurately.
How to Use a Compass: Cardinal Points & Degrees
The four cardinal points on a compass are North, South, East, and West—or N,S,E, and W. A cardinal direction can also have the word “due” placed before it. For example, directly east can also be called “due east”.
These fundamental directions are constant no matter which way you face. But because they cover such vast areas, they’re divided into more specific points and subpoints. The midway points between the four main cardinal directions are called ordinal directions or intercardinal points.
For example, between north and east is northeast (NE), and between south and west is south west (SW).
Midway between each cardinal and intercardinal point is the secondary intercardinal point. These are east-northeast (ENE), north-north east (NNE), south-southwest (SSW), west-southwest (WSW) and so on. In total, there are 32 points.
For a more detailed navigation, compasses also have 360-degree marks pn the housing dial. These supplement the aforementioned points or replace them completely. To be more specific, north is 0°, east is 90°, south is 180°, and west is 270°. Any point between them is measured by degrees accordingly.
Learn About Compass Types
Whether it’s for plotting a route or simply for finding your way out in the field, the type of compass you should use depends on your activity type specialty. Among the many kinds of compasses, these are the most common:
Baseplate
The baseplate compass is a popular choice for the military, hikers, backpackers, and mountaineers owing to its versatility.. It allows you to take bearings, measures distances, triangulate, and plot routes with high precision.
Invented by the Kjellstrom brothers during World War II, the instrument got its name from the rectangular acrylic plate that the compass is mounted on. As previously mentioned, the plate has rulers on its sides and is made from clear plastic through which you can read your map.
Orienteering Compass
Invented by a Swedish orienteer in the 1980s, the orienteering or thumb compass is a tiny and more compact variant of the baseplate. Both compasses have the same components. But the orienteering compass’ plate has been redesigned so that it can be attached to the thumb, leaving one hand free for convenience.
Lensatic Compass
Also known as the prismatic compass, this type is designed for sighting and taking bearings from distant objects. It has a prism that takes accurate readings and may be used by hand or by mounting it on a tripod for added stability. This compass is mostly used by surveyors and engineers.
Difference Between True North and Magnetic North: Declination Adjustment
The “north” that the magnetic needle in your compass points to is different to the Earth’s True North. Depending on your location, your compass’s magnetic “north” could be off of True North by several degrees. This is due to the influence of the planet’s fluctuating magnetic fields and core elements on the magnetic needle in your compass housing.
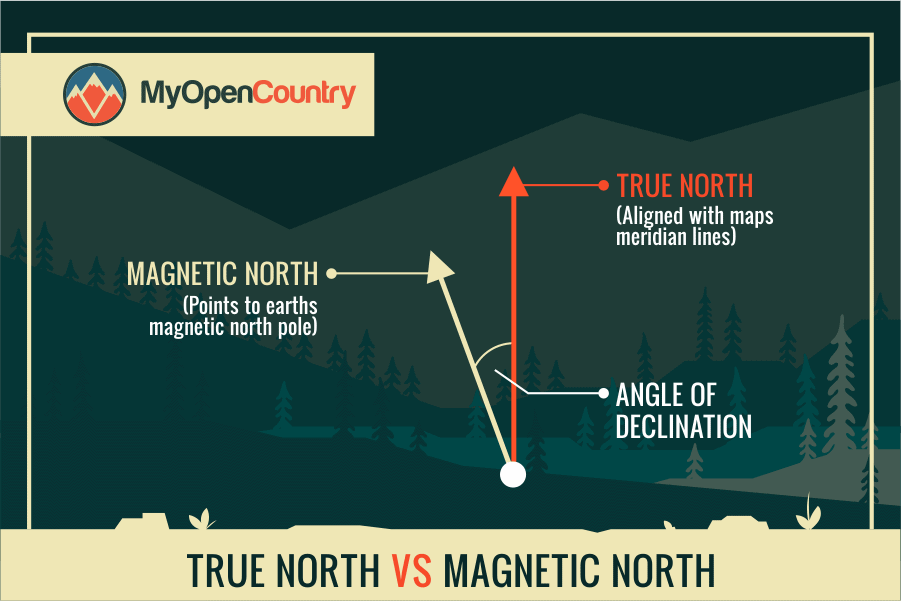
This being so, it’s vitally important to accurately set the declination to avoid taking faulty readings and traveling off course.
To adjust your compass to the correct declination, here’s what you should do:
- First, determine the declination value of your trip area. You can search for this at NOAA (National Oceanic and Atmospheric Administration) or, in many cases, by consulting your map—several topographic maps include the zonal declination in the legend at the bottom. It’s worth remembering, however, that the declination of specific locations changes over time, so be sure to check the map’s revision date.
- Depending on the map’s declination value, rotate the compass’ housing clockwise (west) or counterclockwise (east). It should move independently from the bezel via a key or by pressing your thumb at the center.
- By then, the declination indicator (the mark at the opposite end of the orienting arrow) should move along with the housing. Point it to the correct declination. For example, if the map indicates 8° west of north, position the indicator at 8° clockwise.
For a better understanding of calibration methods, head over to our in-depth article here.
Using Your Compass to Orient a Map
To orient a map is to simply place it in such a way that the top faces True North and its right side points east.
To do this, first calibrate your compass to the appropriate declination. Then place it on the map. The travel arrow should point to the top of the map and the straight edge should be lined up with the map’s edge and grid lines.
Turn the bezel so that north is aligned with the travel arrow. Now the north marker on the compass is in the same direction as north on the map.
Next, hold the compass and map steadily and rotate your entire body to move the magnetic needle. Keep turning until the needle settles inside the outlines of the orienting arrow. The map is now oriented or correctly positioned. You’re now ready to plot a course.
How to Use Compass to Plot a Course
Basically, plotting is moving from point A to B. If you know your current position, then it’s just a matter of creating a path to where you want to be.
Here’s how it’s done:
Lay your compass on the map again. Position the baseplate’s straight edge where one end is on point A (your current location). Make sure that the travel arrow faces point B (your destination). Then draw a line between A and B.
To know how far the destination is, look for the map’s scale. This indicates the landscape’s real distances. All you have to do is to multiply the distance on the map by the scale’s divider.
For example, a scale of 1:50 000 means that every 1 mm on the map must be multiplied by 50,000 to get the actual distance of the landscape. So every 1 mm is equivalent to 50,000 mm (50 meters) or 0.031 miles, and 1 cm equals 500 meters.
Take a Bearing
It may sound intimidating, but a bearing is just a very specific way to tell a direction. For example, instead of saying north-northeast, you might say “a bearing of 22.5°”.
Now that you know where you’re headed, it’s time to determine the specific direction of travel needed to get there. With your compass still on top of the map, rotate the bezel until the orienting lines match the north-south gridlines. With the north marker still pointing to the top of the map, read the bearings indicated by the index line.
This bearing tells you the precise direction you should follow.
Next, remove the compass from the map and hold it flat on your hand and rotate your entire body until the magnetic needle is positioned inside the orienting arrow again.
The direction that you’re now facing is the exact bearing you’ve captured before. Follow it to reach your destination.
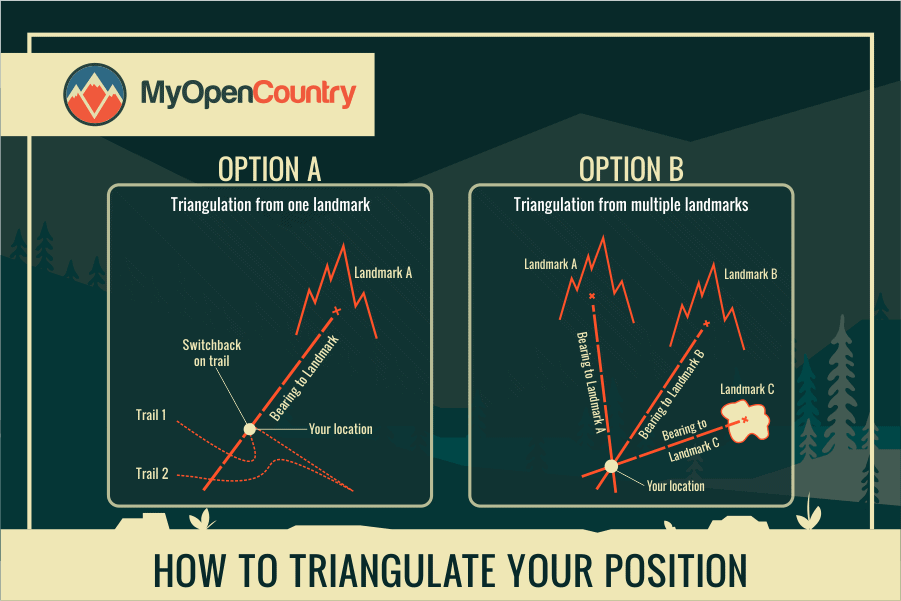
Using a Compass to Find Your Location
But what if you’re unsure about where you are in the first place? How can you get to point B if your unsure about point A?? Given the right circumstances, the compass can also take care of that.
If you’re lost along a trail, look for a landmark. This could be a lake, a boulder, or any other easily identifiable feature. Holding the compass, point the travel arrow towards the landmark. Turn the bezel until the orienting arrow captures the magnetized needle and then note the bearing at the index line.
Now, locate the landmark on your map and place one end of the baseplate’s straight edge on it. Point the travel arrow to the landmark. After that, rotate the baseplate until the orienting lines are vertical, from north to south, and so the north marker on the bezel is aligned to the map’s own north.
Following the straight edge, the point that crosses the landmark and your trail is your current position.
Tips
- Before heading into the wilderness, test your compass skills on familiar territory to hone your skills
- Unless you’re going north, always follow the travel arrow rather than the magnetized needle
- When using a map, the orienting arrow should always point north—,even if you’re heading south
- After taking your initial reading, repeat the process every now and then to make sure that you’re still heading in the right direction
- Don’t keep your compass close to knives, cellphones, speakers, stereos and, of course, magnets—these items have strong magnetic fields that could reverse the compass’s polarity, forcing the needle to point south
Finding Your Own Trail
In a world where digital compasses are embedded into our phones and watches, learning the basics of compass use remains as vital as ever. Mastering how to use a compass is not only important for emergency preparedness, it’s also fun, easy to do, and will come in mightily handy when your battery-operated devices are out of juice!
We hope that you enjoyed reading this guide and that it helps you with your next outdoor adventure. As with all skills, using a compass takes both patience and practice, so don’t get frustrated if you don’t get it right first time. Let us know how your first readings went in the comments below!

