
Long ago, before a host of satellites and space junk orbited the earth, before Uber and Google Maps, people actually used paper maps and a compass to navigate. If you plan to spend any time out in the great outdoors, then knowing how to use a map and compass is a key skill.
Regardless of whether or not you think navigating is cool and that it will endear you to attract future mates, if you’re headed out into the bush, you should know how to read a map and compass.
Even using GPS devices to get around, you’re going to have to be able to orient yourself. The second your GPS gets wet, runs out of juice, or when you need to point lost hikers in the right direction, or direct others to that sweet cave you saw a few days back, you’re going to use that map.
And if you can’t use that map, at best you’re going to look silly, and at the worst, some professional folks may be lifting you out of the wilderness with a chopper after an unexpected elongation of your trip.
Whether you’re going old school on your next adventure in the bush, or just hoping to orient yourself in your local labyrinthine underground mall, read on and discover exactly what it takes to navigate using a map and compass.
Step 1: Learn How To Use A Compass
The Basics of Compass Anatomy
At its most basic a directional compass is just a magnetic needle held on some type of base plate. Going beyond that, a typical outdoor baseplate compass will have a compass housing (rotatable dial) attached to a baseplate that houses the compass needle in some type of fluid. (Check out our guide to the best compass for hiking to help decide which suits you best)
A typical orienteering compass will have the following features:
- Compass Base plate
- Map scale along the edge
- Direction of travel arrow
- Index Pointer
- Magnifier
- Compass Housing
- Liquid Filled Capsule
- Magnetic Needle with red north
- Rotating bezel with bearing marks
- Orienting arrow with red north end (also called orienteering arrow)
- Orienting lines (also called meridian or orienteering lines)
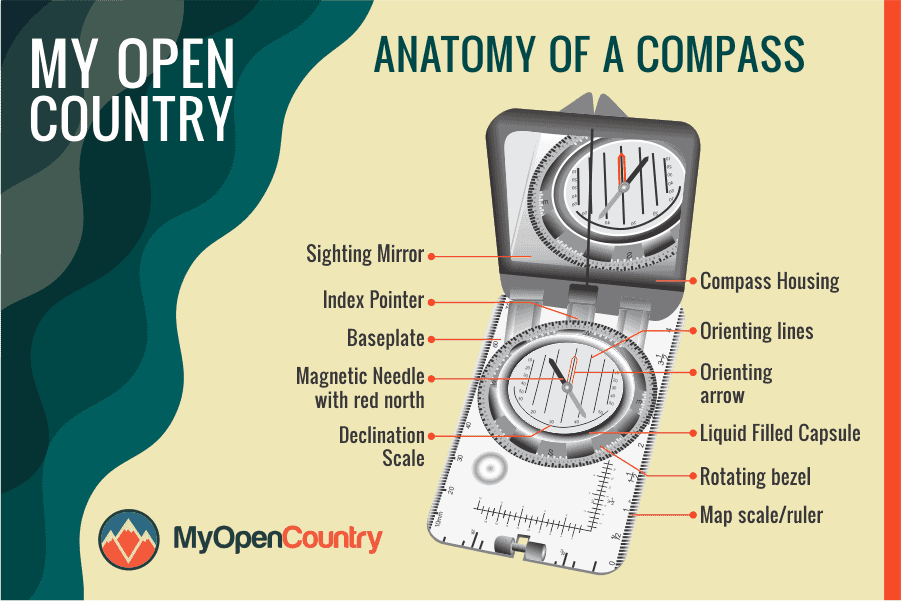
The compass housing contains a liquid-filled capsule that holds a magnetic compass needle. It will have bearing markings around the bezel (azimuth rim) of the compass housing, that indicate the cardinal directions (NESW), and smaller interval bearings between them. Underlying the magnetic needle, and printed on the base of the compass housing are the orienting arrow and orienting lines.
The baseplate of the compass will also have an arrow called the direction of travel arrow, which will generally be parallel to the longest edge of the base plate. In addition, you’ll often find scales/rulers along the edge of the baseplate to aid in measuring distances on maps.
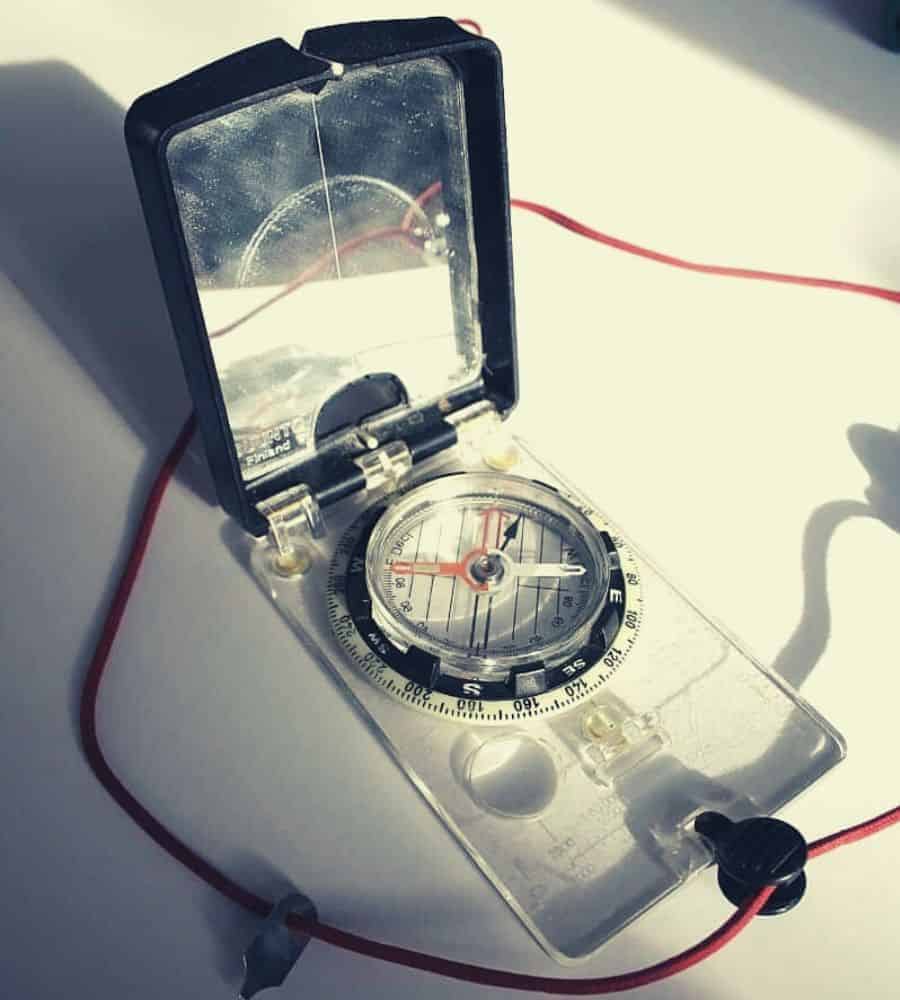
More advanced models of orienteering compasses may have a sighting mirror and sighting line built into its cover, which aids in taking more precise bearings on landmarks. Alternatively, lensatic compasses (as used by the military) will have a slot with a sighting wire incorporated in the cover, which is then aligned with a sighting slot for your eye on the opposite edge of the compass.
So now you know the various parts, let’s learn how to use a compass to take a bearing.
How to Use a Compass to Take a Bearing
A bearing is the direction of something else (a mountain, a house or your final destination) relative to your current position or starting point. Bearings are given in degrees between 0 (North) back around through 360 degrees to north again.
To take a bearing on a distant object, hold the compass away from your body with the direction of travel arrow on your compass baseplate (and sighting line if you have on) pointed directly at the object.
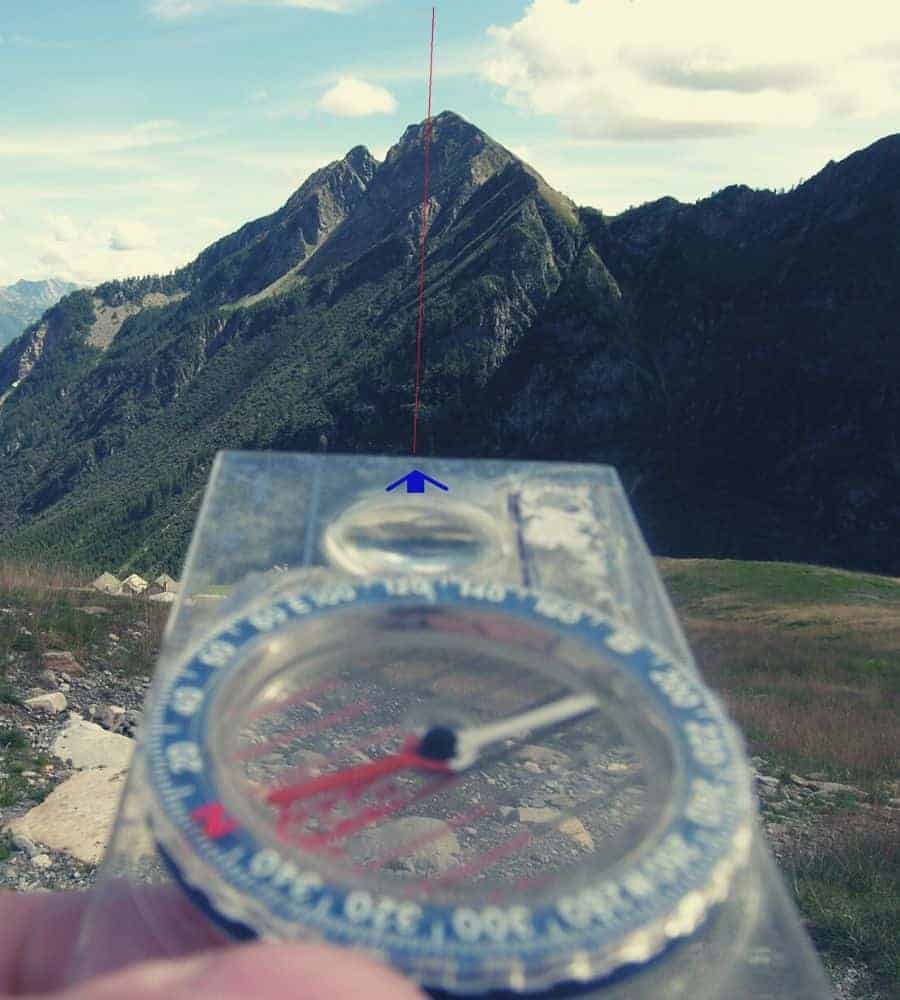
While keeping the direction of travel arrow steady on your target, use your other hand to rotate the compass housing, until you have the red orienting arrow directly underneath the compass needle’s red end. This is colloquially known by outdoors folk as “putting the red in the shed”.
Once you’ve got the orienting arrow set you can now read off the bearing number on the compass housing which lines up with the direction of travel arrow. This is the bearing between your current position and that mountain/house/bear in the distance!
Compass Caveats
While taking a direction bearing seems pretty straightforward, the earth’s magnetic field has a way of making the issue a tad more complicated than it first looks.
True North vs. Magnetic North
Many people don’t realize that there is a difference between the north on your map, and the north your compass is pointing to. So what gives?
The magnet in your compass needle points to the magnetic north pole of the earth or Magnetic North. This is not, however, a fixed location; it changes slightly every year.
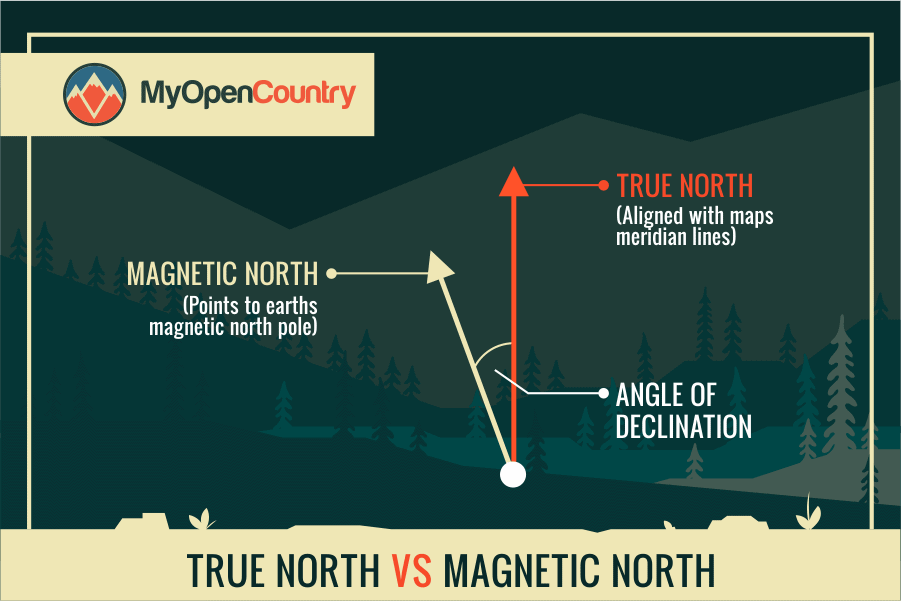
True North, on the contrary, does not change, and your maps are oriented along the longitudinal lines that converge at this point (the actual north pole).
When you hold the compass and line it up so the needle points in the same direction as the direction of travel arrow, you are facing Magnetic North. To navigate correctly, you are going to have to account for the difference between the two Norths, a process that is known as adjusting for declination.
Declination
Because Magnetic North lies somewhere to the South of True North, you’re going to have to either add or subtract a few degrees (shown on the azimuth ring of your compass housing).
Maps will have a small note on declination, saying something like “Subtract 7° to adjust for declination.” Others will just state the declination by saying “Declination: 7°E,” or “7° W.” If the map does not tell you whether to add or subtract, you must remember to always subtract the eastern declination or add the western.
Remember this with the saying: ‘West is best, and East is least.’ Another way to remember this is if the declination is to the East, move the compass adjustment towards the East, and vice versa for West.
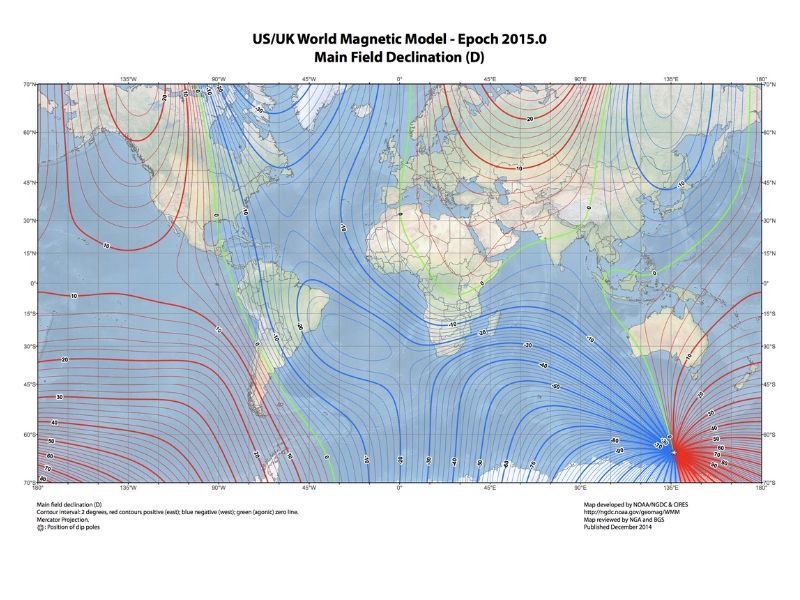
In North America, declination ranges from 30°E in Alaska to about 30°W in Newfoundland. No declination is needed along a line that stretches from roughly the center of Lake Superior down to around Jacksonville, Florida. If you are not traveling in North America, make sure to familiarize yourself with the declination adjustment necessary in the region before traveling.
Once you determine the declination of your region, rotate the azimuth ring around your compass housing by adding/subtracting the corresponding number of degrees. The downside to this method is it has to be done every time you use your compass to check your bearing. In addition, it is very easy to make a mistake or forget, which can quickly render you off course.
Alternatively, most good compasses have a small screw adjustment that will correct the declination, by rotating the orienteering arrow and orienteering lines without the need to adjust the azimuth ring. Now, if you line the compass needle up with Magnetic North, the top of your compass will be pointing toward True North.
Keep in mind that declination changes over time. As the years go by, the earth’s magnetic changes due to variations in the earth’s chemical composition at depth. If you’re using old maps, find your location on this site, and it will tell you your current declination.
How to Read a Topographical Map
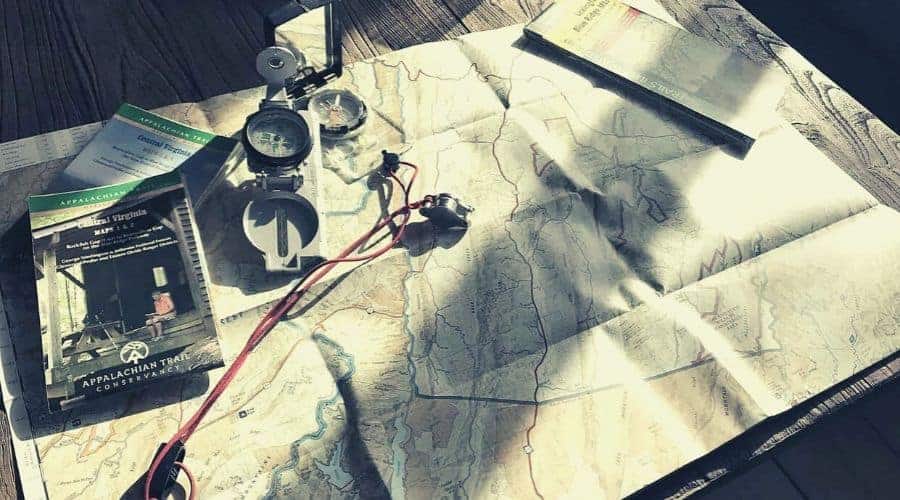
The first thing you’re going to need is a reliable paper map. Many national parks and reserves provide basic maps that show trails, natural features, canoe routes, etc. These maps tend to keep you on the beaten path. If you want to do some real exploring, you’d best equip yourself with a topographical map.
According to Natural Resources Canada, topographical maps:
“depict in detail ground relief (landforms and terrain), drainage (lakes and rivers), forest cover, administrative areas, populated areas, transportation routes and facilities (including roads and railways), and other man-made features.”
In short, they include almost everything that comes in handy when navigating anywhere on planet earth.
There are numerous methods mapmakers have used to show relief and land features in the past. Conventional topos today, however, use a system of lines and symbols. Even knowing the basics of a topo, it can still resemble the integrated circuitry layout of your old desktop. The following are a few aspects to understand before navigating:
- Contour lines: The thin (usually brown or black) lines on the map running hither and yon are known as contour lines. Each line represents a certain elevation above sea level. Typically every fifth line will be thicker and is known as an index line.
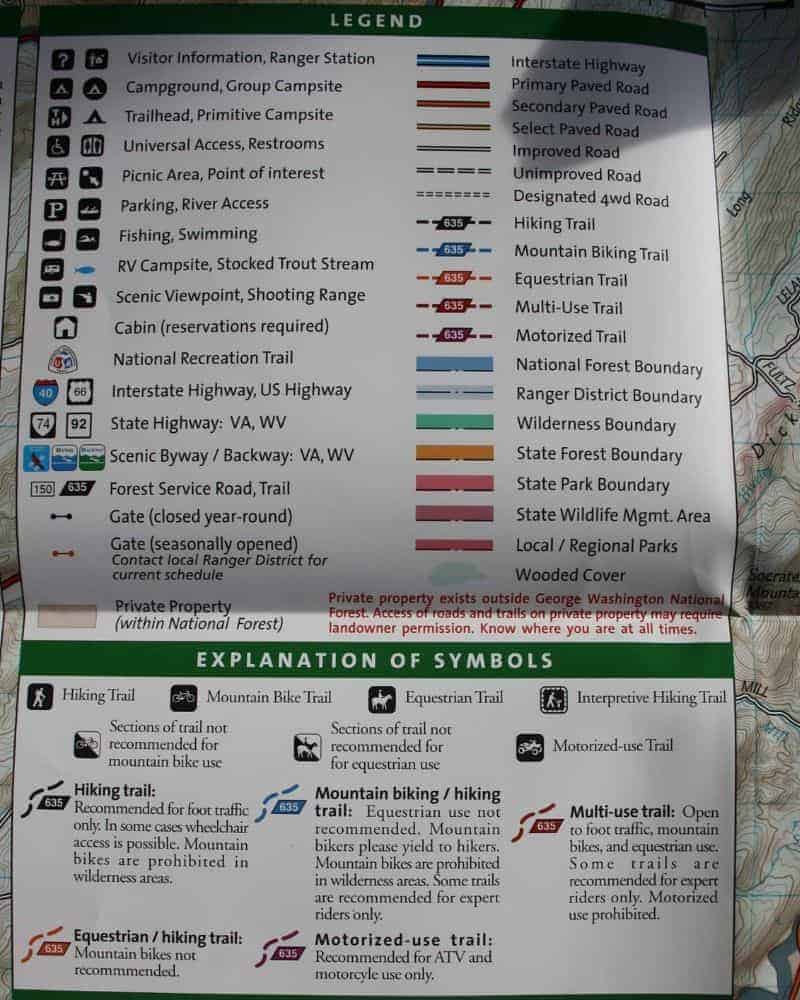
- Symbols: Every map series will indicate features slightly differently. They will describe what each item means in their respective keys. A map’s key not only lays out the symbols it has for campsites, parking, emergency services, and outfitter locations, but it also details how the map describes the land. Green typically indicates land, and water is blue. But trails, state roads, interstate highways, dirt tracks, boat launches, and open camping can be represented in a variety of different ways. Make sure you familiarize yourself with these symbols before setting out.
- Scale: Your map stretches, perhaps, a half meter square in your hands, but how many square kilometers does it cover? The map’s scale tells you what a distance on the map represents in terms of kilometers or miles. It is usually depicted as a ratio of either inches or centimeters. 1:100,000 in centimeters means one centimeter on the map equals 100,000 cm (or one kilometer) on the ground. Make sure you know the units and their conversions before setting out.
- Grid Lines: An additional set of lines on the map are grid lines, which divide the mapped terrain into smaller square boxes.

How to Read a Topographical Map
Reading and correctly following a map can be challenging in rough terrain, even for seasoned adventurers. Problems often arise around contour lines and accurately determining scale and distance. Here are a few things to keep in mind:
- One contour line represents one rise in elevation, with every fifth line (called an index line) being thicker to make it easier to read. One line will link together in a round shape to indicate a hill, or run in long, twisting lines to show a ridge. As you cross over the lines on the map, you are going either up or downhill.
- The space between the contours is known as the contour interval. This is the difference in elevation between each line, and every map will include this interval in its legend or near its scale. If the contour interval is 50 feet, that means that, as you leave one line and move to the next on the map, you are changing your elevation by 50 feet.
- When the lines are spread wide apart indicate flat, or gently sloping ground. Lines that fit close together indicate steep pitches. If you’re lucky enough to see multiple, nearly overlapping lines crossing a river, it’s definitely worth checking out (you may just find an impressive waterfall).
- Determining distance on a straight road on a topo map is easy. But if you’re trying to determine distance on a curving track, it becomes much more challenging. Avoid estimating; you will probably be way off and may accidentally plan exceptionally long or short days. One trick is using a short string. Cut it at a specific length based on the map’s scale. Then use it to trace your path on the map. This will give you a much better idea of distance.
How to Use a Map and Compass Together
Here’s the situation: you are in a known location in the bush, and you’re trying to get to another particular location shown on the map. We’re now going to show you how to use a map and compass together.
Determining Your Location
It happens to the best of us – you miss a turn, wandered slightly off course, and now find yourself in unfamiliar terrain. The quickest way to determine your location is to look for significant landmarks, both next to yourself and off in the distance.
Next, lay the compass on your map so that the long edge/direction of travel arrow is aligned with the north-south meridian lines. Ensure that the compass bezel is set to 0 degrees i.e. north. Now hold the compass on the map and rotate yourself and the map/compass together until the orienting arrow and the compass needle are aligned to magnetic north. Your map (and yourself) are now orientated north.
If there are multiple obvious landmarks on the horizon you may be able to determine your approximate location from their positions on the maps. This can be done with a degree or relative confidence for example if you are standing on a feature such as a sharp switchback on a trail or another feature and there is a large mountain peak several miles north of you.
If it’s not clear what your current position is, then you’ll need to triangulate it.
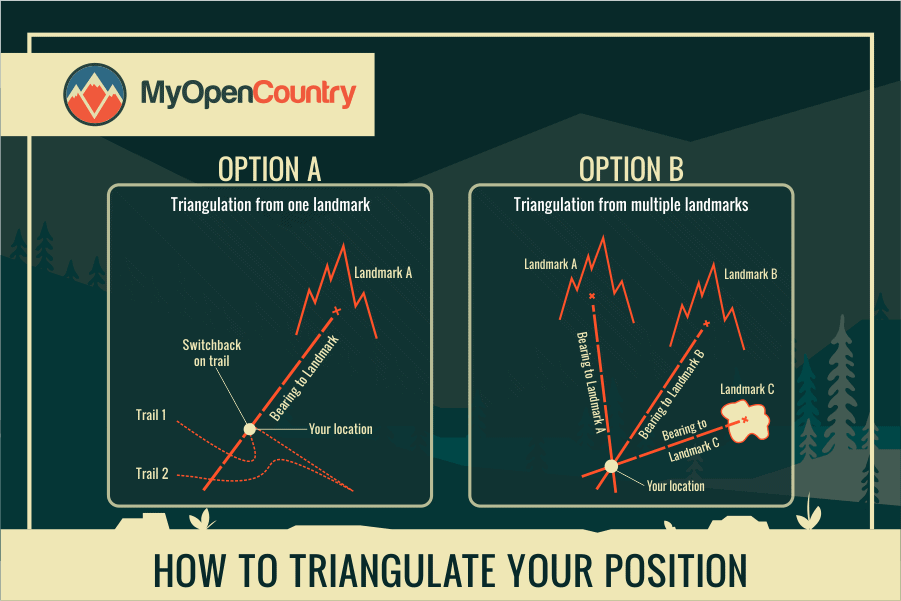
Triangulation is done by determining the relative direction of several features you can see and using a map to see where these bearings converge.
Start by taking a bearing on a very prominent landmark that you can identify on the map, and transfer that bearing from the landmark onto the map by drawing a faint line. Repeat this with a second landmark (and a third if you want to be very accurate). If you’ve taken your bearings correctly, this convergence point should be your current location.
Determining Your Direction of Travel
You know you want to get from your starting point to the campsite which is on the other side of the forest in front of you. Hold your topo map flat and find your starting point on the map.
Next, find the location of the campsite on your map and connect the two places with an imaginary line. Now comes the fun part.
Place your compass on the map and orient it so that the long edge of your compass and direction of travel arrow is aligned parallel to that imaginary line you’ve just drawn. Keeping your compass and map orientation the same, carefully adjust the compass housing so that the orienting lines and arrow point north-south along the meridian lines on the map.
Bingo, you’ve now set your compass direction so it’s honed in on that campsite!
Following a Bearing
Now you’ve set your compass, you can simply head in the right direction by orientating yourself (and the compass) so that the magnetic needle points in the same direction as the orienteering arrow. If you can keep the “red in the shed” as you move then you should be on the correct bearing.
While this method can be useful if you are unable to triangulate from a landmark, it’s very, very difficult to keep the two arrows aligned as you walk. This can lead to errors, especially over longer distances.
If you are traveling any significant distance with this method, we recommend picking a feature such a specific tree or rock that sits on your intended bearing. Once you reach it, repeat the process and pick another object on your bearing.
Depending on how difficult the terrain is, repeat this every few hundred meters or so. Even with the help of a compass, it is easy to stray from your path, and you might quickly pass by your destination, especially when in dense foliage or uneven ground.
Waypoints
Traveling long distances along a specific bearing can be difficult, and often downright impossible. Trails will weave in and out of the hills, you’ll encounter cliffs and rivers and other obstacles in your way. If you are traveling through difficult terrain we encourage you to use waypoints to break up your journey.
Waypoints are exactly what they sound like: points along your way. It’s much easier to link distinctive features together when trekking through the bush than following a straight line from A to B. If you’re using visual waypoints, as we mentioned above, just remember to take a new bearing every kilometer or three. If you’re linking a few waypoints together using the map, take a new bearing after each location.
Conclusion
We hope you’ve enjoyed our guide on how to use a map and compass, and you’ll never lose your way again. If you’re planning on using a map and compass to navigate through the bush, we highly recommend picking up a sighting compass (also known as a prismatic or hand compass). These devices have a mirror that flips up over the compass which allows you to simultaneously follow your sight line while making sure you’re keeping your magnetic needle pointed at 0°. Flip it up periodically to make sure that you’re looking utterly fabulous.

